Signing AWS Requests With Your Arduino
TL;DR
Are you nervous when you include that Amazon Web Services secret key in a config file? Fear no more. With this weekend hack you can turn your Arduino Due into a device that securely stores your AWS credentials and let it sign AWS API requests.
Introduction
In the industry a device like this is commonly known as a Hardware Security Module; an appliance (or PCI card) that manages your keys and/or certificates and then allows you to execute operations like encryption and signature generation. Once stored in the device, the key material is not directly accessible anymore and management of the device and keys usually requires direct physical access and the use of hardware tokens.
These devices are usually very expensive. In the order of tens of thousands of dollars. They come with guarantees and certifications like FIPS-140-2.
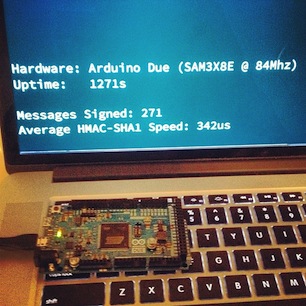
This hack not so much. For this ‘Mini HSM’ I have used my Christmas present, a $50 Arduino Due. There is no warranty or certification, but it has enough power to sign over 2250 API requests per second.
It is also pretty secure; extracting the AWS secret key from the Arduino’s CPU can theoretically be done by reading the contents of the chip with an electron microscope. This of course after getting physical access to the Arduino Due board and then carefully opening up the chip in a specialized laboratory.
You can see the whole project on Github. It is surprisingly easy to get it going. And a small demo that talks to EC2 is included.
I am currently using this with great success in some small personal projects that talk to Amazon’s EC2 and SQS services. (Most AWS API requests are signed using the same method)
Running the demo
Prerequisites
- An Arduino Due (It won’t easily work on older Arduinos)
- A copy of the arduino-aws-hsm project
- The Arduino 1.5.1 IDE for the Due
Patch the Arduino IDE
You can skip this step if you just want to see this hack working. If you do not make this small change, the AWS credentials will be recoverable from the Arduino’s flash memory easily!
Make a copy of the Arduino 1.5.1 IDE and find the platform.txt file. The example below is for OS X:
$ ls -l Arduino\ 1.5.1.app/Contents/Resources/Java/hardware/arduino/sam/platform.txt
-rw-r--r--  1 stefan  staff  3399  5 Nov 18:49 platform.txt
Edit this file and modify the following (probably on the last line):
tools.bossac.upload.pattern="{path}/{cmd}" {upload.verbose} --port...
to look like:
tools.bossac.upload.pattern="{path}/{cmd}" {upload.verbose} -s --port...
The extra -s option will set the Secure Flag so that it is not
possible anymore to look at the chip’s memory after programming it.
Setup the Arduino
First you need to configure the Arduino code with your AWS
credentials. They are hard-coded in the source code. You will need to
change the following section in the Arduino Sketch hsm.ino to
include your AWS Access Key and Secret:
AWSCredentials gAWSCredentials[] = {
    {"YOURACCESSKEYID", "YOURACCESSKEYSECRET"},
    {NULL, NULL}
};
You can add multiple credentials. The code will look at the message to sign and the figure out which one to use.
Now Compile and Upload this sketch to your Arduino Due.
Make sure to delete the credentials from the code after uploading. You don’t want to keep those around in plain text.
Run the daemon
First setup a Python virtual environment with the dependencies:
$ cd arduino-aws-hsm
$ virtualenv --no-site-packages env
$ source env/bin/activate
(env) $ pip install pyserial bottle requests
To run the hsmd.py you will need to know the serial port that the
Arduino is connected to. You can find this in the Arduino IDE or by
taking a look at /dev/tty.usbmodem* on OS X. (On Linux the device
probably has a different name).
$ cd arduino-aws-hsm
$ source env/bin/activate
(env) $ ./hsmd.py /dev/tty.usbmodem1411
Bottle v0.11.4 server starting up (using WSGIRefServer())...
Listening on http://127.0.0.1:8086/
Hit Ctrl-C to quit.
You are now in business.
Run the demo script
The demo script makes a DescribeInstances call to the default EC2
region and then lists all your instances:
$ cd arduino-aws-hsm
$ source env/bin/activate
(env) $ ./demo.py
r-2deb584e i-84cdc8e0 c1.medium stopped
r-f583f596 i-870bdde0 c1.xlarge stopped
...
How does it work?
There are three parts to make this work:
- The ‘firmware` that runs on the Arduino, which does the actual signing
- A small python web service that accepts sign requests and then talks to the Due over the serial port
- A Python library to construct AWS API requests that uses the web service instead of performing the HMAC-SHA1 itself
The Arduino Due
The Due listens for commands on the serial port and then prints out the HMAC-SHA1 digest. It looks very much like this:
HOST->DUE: SIGN-AWS-V2 MESSAGETOSIGN\x00
DUE->HOST: SUCCESS D9E5B887B6E34445B94F8B4F4737AE906DF287C29A12BE67\n
The message to sign is described in the EC2Query API Authentication documentation.
The code running on the Due will look at the message and find the AWSAccessKeyId parameters in it and use that key id look up the secret from the table that you configured prior to uploading the code to the Due.
The HSM Daemon
The daemon is a tiny Python Bottle application
that just listens to POST requests on /sign/aws. It sends the body
of the request to the Due and then returns a JSON structure with the
resulting HMAC-SHA1 signature:
$ curl -XPOST -d @message http://127.0.0.1:8086/sign/aws
{"success": true, "signature": "D9E5B887B6E34445B94F8B4F4737AE906DF287C29A12BE67"}
You could also talk to the Due directly from your code but I like to abstract things behind simple web services. Also, this is single threaded web server which has the nice side-effect that it solves the problem of coordinating multiple processes using a serial port.
The Client Code
The client code can be found in the aws.py module. This is work in
progress for a more complete AWS API but the important bit can be
found in the _generate_signature and _hsm_sign_aws methods.
After constructing the message to sign, you would normally do something like:
def _sign_request(self, msg, secret):
    return hmac.new(secret, msg, hashlib.sha1).digest
With our Arduino HSM and API in place we do this instead:
def _hsm_sign_aws(self, msg):
    r = requests.post(self._hsm, data=msg)
    response = r.json()
    if not response.get('success'):
        raise Exception("Signing failed")
    return response['signature'].decode('hex')
Questions & Answers
You bricked my Arduino. I cannot upload any sketches anymore!
This is the result of the -s (Secure) option that was added. Simply
remove it from the platform.txt file and power up your Arduino while
holding down the Erase button. This will wipe the chip and reset the
secure flag.
This is just a hack? Would you run it in production?
It is a proof of concept but with some small improvements it can be turned into something that I would use in production. I would replace the serial connection with a native USB protocol (with libusb on the host side) to improve the speed and realiability and also make the protocol and daemon more robust.
The Arduino code was also mostly written between turkey dinner and cocktails so it certainly needs a proper review and likely fuzzing to make sure it does not contain any exploitable vulnerabilities.
How are the keys secure?
When the Arduino is programmed with the firmware, and thus your embedded AWS credentials, the Security Bit is set in the device. This means that the contents of the Arduino’s flash memory cannot be read back and that it’s debugging capabilities (JTAG/ICE) are disabled.
There is no simple way, other than physical access and advanced forensics science, to extract them. It is questionable if recovery is possible at all.
What is the effective speed?
The Arduino Due with it’s 84 Mhz SAM3X8E ARM Cortex-M3 CPU is capable of signing about 2250 messages that are 1KB long. This translates to roughly 2.5 mbit throughput without any overhead.
The current proof of concept is limited to a much lower speed because it uses a 115200 baud USB Serial connection. This is obviously not ideal and a good solution for this would be to use the SAM3X8E’s native USB capabilities.
Also, the SHA1 and HMAC-SHA1 code can likely be optimized heavily for the Cortex-M3. I would not be surprised if it can be at least run twice as fast.
Most of my professional and personal work is Open Source. You can find many projects at github.com/st3fan - feel free to leave a bug report or open a feature request.